Wednesday, December 26, 2012

Progressive Storytelling

As we've mentioned before, children are natural storytellers. Whether they are retelling an event from their daily life or making up a new adventure, children's imaginations can make for a fascinating story time.

One way to engage your children in active storytelling is to do progressive stories. This could be a good camping or power-outage activity, or just a way for everyone to enjoy a little time together away from technology.

The idea of a progressive story is that it is a collaborative storytelling effort. One child (or a parent) begins the story by describing a character and setting, such as:
Once upon a time, there was a little girl who lived in a castle. She loved to wear pink every day.
The next person takes the next step, possibly sending the little girl into the woods on an errand, or introducing another character (like a villain). The point is for each person to propel the story forward, and to eventually come to a happily ever after (or not) ending.

One of the best things about telling progressive stories with your kids is how it brings to light each of their individual personalities. Your story will be so full of twists and turns that your little pink-loving castle dweller could end up on Mars defeating an alien horde with a handsome prince from a distant galaxy!

Be patient and have fun with this. As the story progresses your kids might, in their excitement, try ditching the original main character and start a whole new story. Keep them on track and remind them of the importance of seeing the story through to the end--just like in their favorite books and movies.

Thursday, December 6, 2012

Wooden peg dolls

I am having a whole lot of fun making stocking stuffers for my kids this year!

One of my favorite ideas for my daughters' stockings: wooden peg dolls. The materials are inexpensive, and they can be as simple or as detailed as you please! 

Oh, the possibilities!


These little pegs can be found at your local craft/hobby store. I found mine at Hobby Lobby in the woodcraft aisle. They are sanded smooth and all ready to go. I bought some acrylic paint for $0.57 a bottle and got started right away. They took a few days to complete, as I paused to let the paint dry between colors, and my Santa's workshop time is limited to post-bedtime hours ;) 

All painted and ready for a clear coat.
After I was satisfied with the paint job, a few coats of polyurethane were added for durability. Poly is available in handy-dandy spray cans. We had some left over from a previous project. Once that was dry, I added a little fabric and sparkle for accents :)

You can do just about anything with these little guys to suit your kids' tastes! For two of my daughters, I am making little families (one of which is pictured here) for their dollhouse. I have a third daughter who is on the adventurous side, and her set will be female superheroes (ie., Mrs. Incredible and Wonder Woman).

After Christmas, I'm going to let them paint a few extra dolls of their own.

Little boys can have fun with these, too! Besides superheroes, think pirates, army men, or ninjas.

After polyurethane, with some added accents:
hair bows, lace, and "jewels"


Just for fun, I picked up a little, unfinished wooden box to paint and monogram. The monogram was very simple. I pulled up Microsoft Word, sized the letter and chose a pretty font, and printed it out. Then I traced the initial on the box with tracing paper and painted it in! 

Are you going to give these a try? Tell us your ideas in the comments below!

Wednesday, November 28, 2012

It's "Ornamental"!

I love handmade ornaments. Some of my favorites are the ones that my kids have made at school. But even better are the ornaments we have made together! This year we took plain glass ornaments and covered them with beads (pictured on the left).

Plain, clear glass ornaments are perfect for customizing because there are so many possibilities! And, barring any gravity-related tragedies, they will be treasured for years to come.

To create the ones pictured here:

Bead Covered Ornament

Use a small paintbrush to cover the entire ornament with a generous layer of Tacky Glue. Then roll the ornament in a bowl full of tiny glass beads. Hang it to dry overnight.

Stuffed Ornament (the one in the middle)

In the one pictured, we simply put a few strips of sheer shiny fabric into the ornament. You could also fill your ornament with tiny paper snowflakes, sparkly yarn, Christmas confetti, or any other light-weight material that you think would look snazzy.

Paint Swirl Ornament

Choose two shades of acrylic craft paint. In ours we used metallic gold and plain white. Squirt a generous amount of each color on opposite sides of the inside of the ornament. Shake gently to spread the paint, then leave it to dry overnight before replacing the ornament cap.

Other Ideas

  • Paint the outside of the ornament with a fun Christmas design and/or your child's name and the year.
  • Use glue to draw a simple design, then sprinkle with glitter.
  • Tie a ribbon to the top of the ornament in place of a hook.

Will you try these? What types of ornaments have you made with your kids?

Monday, November 12, 2012

Playing in the leaves

Today was an unseasonably GORGEOUS fall day. 

We spent it raking and playing with leaves! We have the misfortune of having no trees in our yard, so we traipsed across the street to an elderly neighbor's house and asked if we could have their leaves. They seemed happy to oblige.... we cleaned up their yard and brought the piles home! 

All kids like to jump in a pile of leaves. Now, what else can they think of? 

My kids played a game they invented, like a combination of duck-duck-goose and tag, with some leaf-throwing and pile jumping involved. They also:

were eggs in a nest


made leaf-angels

target-practiced with foam swords

and, oh yeah: they did plenty of jumping!

Happy raking!


Thursday, October 25, 2012

What do you see?

A heart
It's fun to look for patterns in nature. We may see elephants in the clouds, dragons in a fallen log, or shapes in clusters of leaves.

The next time you and your kiddos are out walking in the park, take a closer look at the things around you. What patterns do you and your children see?

Who knows? Maybe there is a goblin in a tree stump just waiting to be discovered!


A dragon or sea serpent?
Add to this creative endeavor by turning your discovery walk into a scrapbooking or journaling project. Your kiddos might enjoy creating captions for the photos you snapped while you explored.


What do you see?


Thursday, October 11, 2012

Party!

My birthday was a few weeks ago. It just so happened that my birthday was during one of my most hectic weeks in recent history, so when festive little children asked what I wanted to do for my birthday, I wasn't sure what to say. Children cannot even fathom letting a birthday pass un-celebrated.

After thinking for a while, I told them I wanted a party, for just our family. (There are enough of us to make an instant party.)

But there were two rules:
A perfectly set, confetti-splashed pizza dinner!

1. The children had to do all the planning.
2. They had to use things we already had. No $400 trip to the party-outlet store.

They were divided into three committees (6 children, 2 per committee): food, decorations/invitations, and games.

And I turned them loose. Their dad was available to offer technical help, and to do things that kids can't do.... like drive for pizza.
Handmade birthday banner

They worked very diligently for a week, and our basement was Top-Secret and off-limits to me. On the big day, I left the house for a short time so they could set up, and when I got home, I was astounded. They had stayed true to the rules, and they went all out for Mom!

The food committee had a wonderful spread of pizza and chips, and even a few treats.

The games crew had us playing hot potato and musical chairs. I won at hot potato. I think the little person who was stopping the music was peeking and giving me an unfair advantage :)
Streamers and balloons

And the decorations crew really outdid themselves with banners, confetti, and streamers. They also made an extra invitation for my scrapbook. They've seen me do that for baby shower moms. Sweet!

I loved it. We had a great family time!

One of the coolest things the kids did? They made mailboxes for everyone's bedroom door, for invitations and RSVPs to be exchanged. Those mailboxes are still hanging today, and are a rather fun source of household communication: notes, letters, pictures, cards, small gifts, etc. I think we're going to keep them up for a while (as long as they'll hold up!)

Mailbox, fashioned from whatever cardboard could be found :)
Complete with a flag to be raised when mail is delivered.


Thursday, October 4, 2012

Print-making Made Easy


Helping your kids make their own prints or stamps can be fun and practical. When finished, the stamps can be used over and over again to make personalized cards, gift bags, or even art prints to frame and hang on the wall (or give away as gifts).

There are a couple of different methods you can use to create the prints. One involves using sharp carving tools and a special stamp-making block that you can purchase at a local arts and craft store. The other method, which is safe enough even for the pre-schoolers, involves using a pencil and a piece of styrofoam from the grocery store (like the kind you find veggies packed on in the produce aisle). No matter which method you choose, you will end up with a darling kid-crafted work of art that you can duplicate over and over.

First, the tot (and budget) friendly method:

You will need paper, pencils, sheets of styrofoam trimmed to about 4x6 inches, tape, poster paint or block printing ink, and a paint brush or ink roller.

1. Have your child draw a simple design on a 4x6 section of paper. Don't let him get too detailed because small details will not show up well in the finished product.

2. When satisfied with the design, help your child to transfer the image to the styrofoam by taping the drawing to the foam and drawing over it. Be sure to press into the foam as you draw. 

3. Remove the paper from the foam and inspect it to make sure the design is transferred properly. If the design is not pressed sufficiently into the foam, trace over it again, making sure to press into the foam, leaving deep grooves.

4. With a paintbrush or roller, apply the poster paint or ink to the entire surface of the newly made "stamp." Be careful not to let the paint fill the grooves you just made (this is easier to avoid when using a roller rather than a paint brush). 
*Note: If you use a roller and ink, simply put the desired amount of ink onto a paper plate and roll the roller over it until it covers the roller surface. Then use the roller to roll the ink onto the stamp.
5. Get stamping! Press the image onto a clean sheet of paper, being sure to put even pressure of the entire surface. 

If it didn't turn out exactly like you expected, tweak it a bit. If the design doesn't show up quite right, it may be that the grooves weren't deep enough. If the ink doesn't transfer completely, it may be that you didn't use quite enough ink. But remember: small imperfections in the finished print make each one that much more unique, so don't be too picky!

Clean-up is easy. Simply rinse the stamp and roller in cool water and let them dry!


Now, the traditional method:

You will need to purchase a set or two of linoleum block cutters. They can be ordered online or found at a local arts and crafts store. 


You will also need some speedy-cut carving blocks, also available for purchase online or at a local arts and crafts store. These come in a variety of sizes, are soft and pliable and very easy to cut into. 

Other supplies you will need are paper, pencils, ball point pen, carbon paper (or alternative -- see instructions), roller, and block printing ink. 

1. The first thing your artist needs to do is draw a design, using a section of paper the same size as the block to be used. The design should be fairly simple, but there is more room for detail in this method than when using styrofoam. Keep in mind that the more detailed the design is, the trickier it will be to carve into the block.

2. Transfer the image using carbon paper. Alternatively, you can use a soft lead pencil (such as a 6B art pencil) to shade in the back side of the paper with the design on it. Place the paper shaded side down onto the carving block, then trace using a ball point pen. 
*Note: Another option is to draw the design directly onto the block itself.
3. It's a good idea to trace over the design on the block with ball paint pen. This will help ensure that the image is sharp and clear and won't get rubbed off.

4. Time to carve! Your artist will carve out whatever she wants to remain white (or the color of the paper) in the finished print. Be careful not to carve out something that is meant to be printed!
*Note on safety: Always supervise your child when he or she is using sharp tools. When carving, be sure that the sharp edge of the cutting tool is facing away from you at all times. Use a non-skid surface to keep the block from slipping, such as a piece of a non-slip rug pad or similar product.
5. Using the method described above, use the roller to spread ink onto the surface of the block. Be sure to cover the entire surface evenly.

6. Use gentle, even pressure to print the design onto a sheet of paper. Inspect the print to be sure that you didn't forget to carve out any part of the design. Then you can repeat the process to make framable art, note cards, or custom gift bags!

Clean up by rinsing the block and roller in cool water.

Questions or comments? We'd love to hear from you. In the mean time, have fun printing!

Wednesday, September 26, 2012

T-shirt painting

 A few months ago, our family welcomed a brand-new baby into our home. What a sweet little blessing he has been! We celebrated his arrival with personalized baby onesies.

I originally planned this project as a distraction for my children while I labored at home, but I ended up laboring overnight, and the baby was here when they all woke up... so this turned into a let's-let-mama-and-the-baby-rest-while-we-make-something (with Dad!) project. :D


Dad gave everyone a (prewashed) plain white baby bodysuit, and some fabric paint, and they all sat quietly to work on their gift.

Cute little model! Cute little tee!


This is an easy and fun activity for every family member! The squeeze bottles are rather child-friendly and easy to use. I recommend practicing on some newspaper to get the hang of it, but my kiddos caught on really quick!  It also helps to insert a piece of cardboard in the shirt to prevent leaking and to provide a flat surface to decorate. After that, your imagination is the limit! My family had a wonderful time, and their baby brother now has six keepsake baby tees that were created with much love, just for him!


These will be going into his "When I Was a Baby" box!

Wednesday, September 19, 2012

Technology, the enemy?

I've said it. You've probably said it. Parents all over the world have said it. Technology is turning our kids into brain-dead zombies! With the popularity of movies, video games, texting, social networking, online gaming...our kids are in danger of forgetting what it means to use their brains for anything besides how to keep a virtual pet happy or send a text message with the fewest characters possible.

It's frustrating to watch. But it doesn't have to be this way. Technology can be creativity's ally!

Consider for a moment the brain power that goes into designing a gaming site, or writing and directing a movie, or inventing new technologies that (ironically) put our kids (and us) in danger of losing their brain power. There are some brilliant, creative minds behind the technology we find ourselves fighting against.

So, what can we do about it? The obvious answer is to limit your children's access to movies, video games, apps, etc. But that doesn't have to be all. We can also help them to learn to be creative with technology.

One way to do that is to have your kids shoot and edit their own movies, such as this one that my kids and I made one rainy Sunday afternoon:


This movie was made with a digital camera and the iMovie program. The stop-motion technique took a lot of patience (and creativity), but was more than worth the effort in the end. Stop-motion is also fun to do with Legos. 

But you don't have to get all complicated if you are new at movie-making. A good place to start is to have your kids select a series of photographs on the computer and set them to music. You can do this using a program like iMovie or Windows Movie Maker

Of course, actual video clips are fun to work with as well. Your kids can begin with a series of clips taken during a summer trip and add music and titles, even sound effects. They could also start completely from scratch and make up their own story, then act it out on film. They will get a big kick out of watching themselves in the final product, and who knows, it may get them itching to create another one!


Wednesday, August 29, 2012

Scrap that project.


Kidlings have lots of fun with cameras. I have never heard a complaint of boredom from a child who has one in hand.

Don't let the end of the photo shoot be the end of the entertainment; taking pictures is only half of it! There's a story to be told....


Making a scrapbook is an attractive way to display their photos to share with friends and family. It doesn't have to be fancy, and you don't have to run out and buy hundred of dollars' worth of tools and supplies. You can find an album for around $10 at a local hobby store; or thrift stores and garage sales can be a wonderful resource.

As an added bonus, scrapbooking is a non-intimidating chance to get those kids to write! Encourage them to write a few simple sentences to tell:


  • what is happening...
  • who is in the photo (or behind the scenes!)
  • when and where the photos were taken
  • why they chose to snap a particular shot 
You can also add details that the album's viewer would find interesting. Remind them that their children and grandchildren may be enjoying their album someday!


Here is a sample page from my nephew's scrapbook. His mom took the pictures, but he helped put the story together.

What stories will your kids tell?

Wednesday, August 22, 2012

Suggestions for family reading

Reading is great for minds.

Reading together is great for families!

So here are a few suggestions for great family reads.

THE TALE OF DESPEREAUX, by Kate DiCamillo, is a wonderful little fairy tale story about a mouse who longs for adventure and ends up helping to rescue a human princess. But don't let the mention of the princess scare off the boys. This story is full of heroic deeds, dastardly rats, dark dungeons and, oh yes, SOUP!

Other beloved books by Kate DiCamillo are BECAUSE OF WINN DIXIE, THE MIRACULOUS JOURNEY OF EDWARD TULANE, and THE MAGICIAN'S ELEPHANT.


The LITTLE HOUSE Books, by Laura Ingalls Wilder. Who can forget these classics? Filled with adventure and family drama, these books are perfect for the family who wants to blend a good story with learning about life as a settler.

Some other series suggestions are THE CHRONICLES OF NARNIA, by C.S. Lewis; JUNIE B. JONES, by Barbara Park (for younger kids); PETER AND THE STARCATCHERS, by Dave Barry and Ridley Pearson; and THE LORD OF THE RINGS, by J.R.R. Tolkien.


Are you looking to generate some deep thinking or engaging discussion? THE GIVER, by Lois Lowry, is sure to give your kiddos' brains something to ponder. Set in a future dystopian society, THE GIVER is about a young boy who learns how much his society has given up in order to obtain equality and peace. But was it worth the sacrifice? You'll have to read it to find out!

Other thought-provoking and discussion-generating reads are THE CITY OF EMBER, by Jeanne DuPrau; ROAD TO PARIS, by Nikki Grimes; OUT OF MY MIND, by Sharon Draper; and SURVIVING THE APPLEWHITES, by Stephanie S. Tolan.


Of course, there are so many more wonderful books out there just waiting to be picked up and read by you and your kids. So, what are you waiting for? Grab one of these books and get reading!

Do you have a favorite book that deserves to be on this list? Let us know!


Wednesday, August 15, 2012

Paper mache pinata

Warning: this one is MESSY.

Have you ever tried to make a pinata? It's actually really easy. It's just a little time-consuming, and as previously mentioned.... messy.


To make your own paper mache paste, simply mix equal parts flour and water, and then add water gradually, until your paste is about split-pea-soup consistency:


Hang a balloon in an area where 1) it's okay if it gets messy, and 2) the project will hang out of the way for a few days while it dries between layers.

I recommend covering the floor with newspaper :)

Tear newspaper into strips, soak them in paste, and gently squeeze off the excess between two fingers.


 Start  placing strips on the balloon, leaving the very top empty for filling later. It really does not matter how you configure the strips, but make sure the whole thing gets covered, and that the strips overlap.


Hopefully it's hanging in a safe place, and you can leave it to dry. My experience is that it takes 12-24 hours, depending on the thickness of the paste and the enthusiasm of the pasters. (Ours got pretty well slathered!)

Once it's dry, you'll want to add another layer or two. The number of layers you add will also depend on your paste and your pasters, but three should be plenty. Much more, and you'll have trouble breaking it later!

Once the last layer is dry, choose one lucky kid to POP! the balloon, and you'll have this lovely little shell to fill with (lightweight) treats and confetti.

Tape your hanger (a piece of twine works fine) to a crumpled ball of newspaper and paper mache it over the top to seal it and let it dry. You may need another layer here, as well.

Paint and decorate as desired!

We made one for a Lord of the Rings party:


                                                   and here's a pirate
                                (he took a hit before I remembered the camera): 


Wednesday, August 1, 2012

Leaf Prints -- a simple project for creatively hesitant kids

Sometimes the best way to encourage creativity in our children is to give them a project that doesn't require too much creativity.

That doesn't seem to make sense, does it?

Let's face it. Some kids (and adults) are hesitant about getting creative. If you give a hesitant child a pencil and a blank sheet of paper, he might give up before he even starts. The pressure of having to think of something on his own might stress him out.

In my opinion, the best thing to do in that situation is to ease the child into creativity one step at a time. Begin with "art" projects that have very specific instructions and predictable outcomes.

One such project is the leaf print, like this one:


This leaf print was done with radish leaves, but you can use any leaves you find growing outside. You will also need paper, poster paint and paint brushes. Here's what you do:
  • Pick the leaves right before you do this project, so that they are fresh and not dry or wilted. Maple or oak leaves work very well.
  • Use a paintbrush to lightly paint the back of the leaf (the veiny side). 
  • Set the leaf paint-side down on the paper and gently press the leaf against the paper. 
  • Lift the leaf off the paper to reveal a lovely leaf print that any child would be proud of. 
The coolest thing about projects like these is that there is always room for kids to be creative, but without feeling like they have to be creative. Encourage your children to try different colors, different shaped leaves, etc. Ask questions to get them thinking of variations for this project, or other things to make prints with.  If they are having fun, and not feeling pressured, creativity just might sneak up on them. 

And remember: kids love it when parents do this stuff with them rather than just telling them what to do. So make sure you have your own paper and paintbrush handy!

Have you done leaf prints or similar projects with your kids? We'd love to hear about them!


Friday, July 27, 2012

Piece of cake


About a year and a half ago, my then 10-year-old asked to frost a cake I'd made. She wanted to decorate it, but we had no frosting tools. 

I suggested she use the ol' snip-the-corner-off-a-sandwich-bag trick. 

This is what she came up with: 


With a sandwich bag! Well, three. One for each color. We took it with us to our Easter fellowship dinner after church!

It turns out that our local Walmart has a cake decorating aisle. I bought my budding baker some frosting tips for less than $5 and turned her loose. I also have a friend who is a professional that gave her a few pointers. Talk to your local bakeries and hobby stores and ask about a class.


She also likes ideas that require no special tools.

Fruit-by-the-Foot
A cookie-cutter heart from scraps


The nice thing about cake-decorating kids? 

Their supplies are inexpensive, readily available, and pretty easy to clean up. Also, their "mistakes" are delicious!


Thursday, July 19, 2012

Resourceful kids can build castles!

Since my kids were very little, I've made it a point to do various projects with them with things that we've had around the house. A lot of creative things can be done with old sheets, boxes, scrap paper, etc.

We've had a lot of fun doing those projects, and it has helped my kids learn an important life skill: resourcefulness. Learning to make the most of the materials they have on hand will help them in countless ways as they grow up and and start to do more on their own.

And nothing is more satisfying than when I see them using those skills without my prompting!

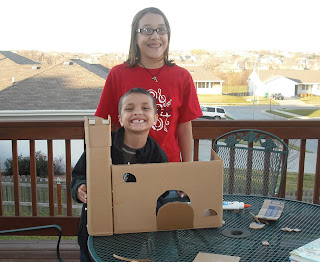
One day when my kids were "bored," my second daughter said to my son (the youngest), "Let's make something out of cardboard!"

He was all for it, so they grabbed a couple of cardboard boxes, scissors, and glue and went outside on the deck and set to work.

What resulted was this cardboard castle:


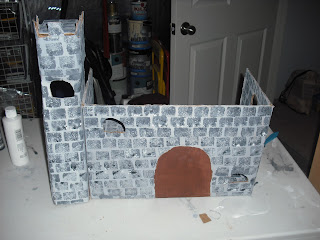
Then they painted it to look like it was made of stone! I hadn't helped them build the castle, but I did help them paint, partly because I didn't want to be left out of the fun. 

the front

the inside

Eventually I helped them make a few pieces of furniture for the inside (pictures to come in a future post). Sometimes they use it when they are playing with their Lego men. And, of course, I promised never to get rid of it!

What else can you do with a cardboard box?


Wednesday, July 11, 2012

Re-purposed

Sometimes a really meaningful, thoughtful, useful gift is right under your nose, disguised as something old and useless. All you need is a little inspiration.

Last Christmas, our family had a homemade gift exchange. My six-year-old drew my name.

She and her dad went shopping at a nearby thrift store, and they bought a small painting for less than $1. They took the painting out of the cute little frame, and put in some window screen that my honey had in the shed.

My little girl had a wonderful time painting the frame and mat, and what do you know?

An earring holder for Mom.

"I made it myself!"

Whoops! She spilled some paint on the screen. It adds to the charm! She did a beautiful job, and I love it.


Friday, July 6, 2012

Word Clouds

Have you ever head of Wordle.net's word cloud generator?

Here is an example of a Wordle word cloud that I made for my daughter:

These word clouds are fun gift or note card ideas (Christmas, birthdays, etc.). They can be framed and hung on the wall or pasted into a scrap book. And best of all, they are a fun way to trick your child into doing some writing.

The word cloud generator uses your text to create a pleasant looking jumble of words that can be tweaked until you are happy with it. All you need is a list of words! Once your child sees these fun, colorful word clouds, he will be itching to try it. So have him sit down and write a list of words that describe himself (this is great brainstorming practice for future writing projects, by the way). Then go to Wordle.net and have a blast!

Some tips to get the best experience from Wordle:
  • If you want a word to appear larger, input that word several times. The more times a word appears in your list, the bigger it will be in the word cloud.
  • To use a phrase, place a ~ between the two words in your list so that the generator will know not to separate them (like in "Spelling Bee Champ" in the sample).
  • Don't have a color printer? Wordle word clouds are just as awesome in black and white. And you could always have your child color them once they are printed.
  • Go beyond having your child write about himself. Create them for other people, pets, holidays, favorite places, etc.
Have fun with your word clouds!

Wednesday, June 27, 2012

Give your kid a camera!

One day last summer my family had a photography contest. Each of us (except Dad--he was the judge) took a series of pictures at a nearby park. When we were done, I loaded the pictures onto the computer and each of us chose two to enter into our friendly little contest. Dad, the judge, chose one of my oldest daughter's close-ups as the winning photograph. But there was no award besides bragging rights.

What was the purpose of that venture?

The primary purpose was simply to have a little fun. It gave us something to do that we had never done before and was a fresh excuse to get the family out of the house and out into the summer sun. But it was also an opportunity for my kids to explore a creative art form--photography--in a relaxed, non-threatening way.

Giving your child a camera and letting them go a little crazy with it (Ah, the wonders of going digital!) is a fabulous way to encourage them to look a little closer at their world. Some kids might experiment with close-ups, like in my daughter's photo of a thistle blossom:


They might try looking at the world at a slightly different angle, like my other daughter's shot of Lake Superior:


Or they might find something of interest in something that most of us wouldn't look twice at, like my son did when he took this photo:

Do you see the bee?

Give your kid a camera, and you just might be surprised at what they see, and how they see it!

Other tips for sharing photography with your kids:

  • Look for photography at art shows and galleries. Talk about the photos with your kids. What do they like or dislike? What, in their view, makes a good photograph?
  • Sort through old photographs at antique stores (or in family albums--ha) and use it as an opportunity to talk about how photography has changed over the years.
  • Talk about the different ways photographers can earn a living.
  • Consider encouraging your child to enter a real photography contest. 
Some photography resources: