Showing posts with label crafts. Show all posts

Wednesday, July 24, 2013

Improvise

Did you miss me?

I've been a busy lady for the last 2 1/2 months: we sold our home, had a baby (our eighth, and we're thrilled!), moved to a temporary rental home, and bought another house two states away. Whew.

We're about to move to the new house, and I've packed up most of the household again, including a lot of our children's things.

So what are they supposed to play with now?

I was quite pleased to find them this morning, playing with dolls and accessories they'd improvised from pipe cleaners. Not a single "I'm booooooored," or nagging from Mom for them to find something to do.

A slice of pizza

Table and chair, with a flower centerpiece

Hairbrush

Basket

Doll #1 in the chair

I'm told Doll #2 is pregnant :D


Monday, April 29, 2013

Book Recommendation: Crafty Chloe

Here is a book recommendation for all of you with crafty kids. Crafty Chloe is a charming picture book about a little girl who uses her crafty creativity to solve a birthday gift dilemma.

So read the book! And check out the Crafty Chloe Make-Stuff Blog to find fun crafts for kids.

Thursday, December 6, 2012

Wooden peg dolls

I am having a whole lot of fun making stocking stuffers for my kids this year!

One of my favorite ideas for my daughters' stockings: wooden peg dolls. The materials are inexpensive, and they can be as simple or as detailed as you please! 

Oh, the possibilities!


These little pegs can be found at your local craft/hobby store. I found mine at Hobby Lobby in the woodcraft aisle. They are sanded smooth and all ready to go. I bought some acrylic paint for $0.57 a bottle and got started right away. They took a few days to complete, as I paused to let the paint dry between colors, and my Santa's workshop time is limited to post-bedtime hours ;) 

All painted and ready for a clear coat.
After I was satisfied with the paint job, a few coats of polyurethane were added for durability. Poly is available in handy-dandy spray cans. We had some left over from a previous project. Once that was dry, I added a little fabric and sparkle for accents :)

You can do just about anything with these little guys to suit your kids' tastes! For two of my daughters, I am making little families (one of which is pictured here) for their dollhouse. I have a third daughter who is on the adventurous side, and her set will be female superheroes (ie., Mrs. Incredible and Wonder Woman).

After Christmas, I'm going to let them paint a few extra dolls of their own.

Little boys can have fun with these, too! Besides superheroes, think pirates, army men, or ninjas.

After polyurethane, with some added accents:
hair bows, lace, and "jewels"


Just for fun, I picked up a little, unfinished wooden box to paint and monogram. The monogram was very simple. I pulled up Microsoft Word, sized the letter and chose a pretty font, and printed it out. Then I traced the initial on the box with tracing paper and painted it in! 

Are you going to give these a try? Tell us your ideas in the comments below!

Wednesday, November 28, 2012

It's "Ornamental"!

I love handmade ornaments. Some of my favorites are the ones that my kids have made at school. But even better are the ornaments we have made together! This year we took plain glass ornaments and covered them with beads (pictured on the left).

Plain, clear glass ornaments are perfect for customizing because there are so many possibilities! And, barring any gravity-related tragedies, they will be treasured for years to come.

To create the ones pictured here:

Bead Covered Ornament

Use a small paintbrush to cover the entire ornament with a generous layer of Tacky Glue. Then roll the ornament in a bowl full of tiny glass beads. Hang it to dry overnight.

Stuffed Ornament (the one in the middle)

In the one pictured, we simply put a few strips of sheer shiny fabric into the ornament. You could also fill your ornament with tiny paper snowflakes, sparkly yarn, Christmas confetti, or any other light-weight material that you think would look snazzy.

Paint Swirl Ornament

Choose two shades of acrylic craft paint. In ours we used metallic gold and plain white. Squirt a generous amount of each color on opposite sides of the inside of the ornament. Shake gently to spread the paint, then leave it to dry overnight before replacing the ornament cap.

Other Ideas

  • Paint the outside of the ornament with a fun Christmas design and/or your child's name and the year.
  • Use glue to draw a simple design, then sprinkle with glitter.
  • Tie a ribbon to the top of the ornament in place of a hook.

Will you try these? What types of ornaments have you made with your kids?

Thursday, July 19, 2012

Resourceful kids can build castles!

Since my kids were very little, I've made it a point to do various projects with them with things that we've had around the house. A lot of creative things can be done with old sheets, boxes, scrap paper, etc.

We've had a lot of fun doing those projects, and it has helped my kids learn an important life skill: resourcefulness. Learning to make the most of the materials they have on hand will help them in countless ways as they grow up and and start to do more on their own.

And nothing is more satisfying than when I see them using those skills without my prompting!

One day when my kids were "bored," my second daughter said to my son (the youngest), "Let's make something out of cardboard!"

He was all for it, so they grabbed a couple of cardboard boxes, scissors, and glue and went outside on the deck and set to work.

What resulted was this cardboard castle:


Then they painted it to look like it was made of stone! I hadn't helped them build the castle, but I did help them paint, partly because I didn't want to be left out of the fun. 
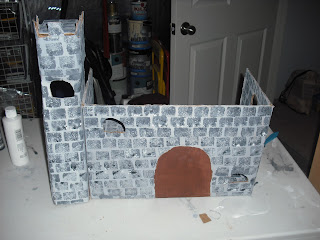
the front

the inside

Eventually I helped them make a few pieces of furniture for the inside (pictures to come in a future post). Sometimes they use it when they are playing with their Lego men. And, of course, I promised never to get rid of it!

What else can you do with a cardboard box?


Wednesday, July 11, 2012

Re-purposed

Sometimes a really meaningful, thoughtful, useful gift is right under your nose, disguised as something old and useless. All you need is a little inspiration.

Last Christmas, our family had a homemade gift exchange. My six-year-old drew my name.

She and her dad went shopping at a nearby thrift store, and they bought a small painting for less than $1. They took the painting out of the cute little frame, and put in some window screen that my honey had in the shed.

My little girl had a wonderful time painting the frame and mat, and what do you know?

An earring holder for Mom.

"I made it myself!"

Whoops! She spilled some paint on the screen. It adds to the charm! She did a beautiful job, and I love it.


Wednesday, May 16, 2012

Let's do some Creative Writing!

If you were in a classroom right now, you'd hear a collective groan.... in stereo surround sound.

It's not as hard as they (or you) think!

How about some stimulating activities to help open those jammed floodgates of inspiration?

With your littles, creative "writing" couldn't be simpler. They are natural storytellers. How fast can you write? Sit down next to a child who's coloring something indistinguishable to you, and ask what's happening in his picture. Get your pen handy, because he knows. After you've written his story out, congratulate him on having written a book, encourage another illustration or two, and make an afternoon of publishing it using your printer for his dictated words, his picture(s), and some cardboard and interesting paper or fabric for a cover. Even brown paper with an illustrated cover turns out adorable :)


Other ideas:

  • Alternate endings 
Pick out a storybook that the kidlets have never seen before, and read just over half of the story to them. Close it and ask them what happens next. Ask some leading questions to draw them out if necessary.


  • A patchwork story
Set a timer. Mom or Dad makes up the beginning of a story and talks for 30 - 60 seconds. When the timer beeps (or dings, if it's a little more old-school!) it's another family member's turn to pick up wherever the story left off. When it comes to your turn again, make sure to throw in some challenge for the main character or an interesting twist and keep them engaged!

  • Narrate nature
Sit in your driveway with your child and watch the ants, or the sparrow, or a rabbit, or even the neighbor's pot-bellied pig. Where do you think he's going in such a hurry? What do you suppose his name is? What are they saying to each other right now?

  • Read to them! All of them! Even big kids like to be read to. Give your kiddos a feel for plots and settings, development of characters, problem-solving and climax, happy endings, and an all-around good story.  Google "100 best kids books" if you're stuck for a reading list (but don't dismiss the classics you liked when YOU were a kid.)