Monday, July 14, 2014

Doll House Bed


I made this bed for my daughter's doll house. It's made of chipboard (like the solid backing on the back of a pad of sketch paper). It's about 6 inches long, and 3 inches wide (12in scale).

This was the first doll bed I have ever made, so I don't have step-by-step photos or a how-to prepared. But it wasn't all that difficult to make. All you need is a headboard, a footboard, bed rails, and a mattress. I found a template for the pieces here, but I simplified the construction process.

I put the bed together using tacky glue, and covered the headboard and footboard with fabric. The mattress is made with a 3x6in sheet of chipboard and 2 layers of polyester batting covered in a simple white fabric.

The pillows are hand sewn and the blankets are simply 6x7in pieces of leftover knit material.

I think it turned out super cute, and I will definitely make another one. After all, this little girl has a brother!


Thursday, October 31, 2013

A multicolored castle


This is our Lego castle. It took us a week, and most of our bricks, to build.
What massive structure have you created with Legos lately?

Thursday, September 26, 2013

A Hobbit Feast!

September 22 is my oldest daughter's birthday. It is also the birthday of Bilbo and Frodo Baggins, of J.R.R. Tolkien's The Hobbit and The Lord of the Rings Trilogy. If you are Tolkien fans like we are, you will understand what a treat it is for my daughter to share her birthday with such famous literary characters! And it may come as no surprise to you that she requested a Lord of the Rings themed birthday celebration.

She was turning 18. It was quite possibly the last real birthday party she would have here at home. So we indulged her, and planned a Hobbit Feast that even Bilbo himself (and the dwarves, no doubt) would have been proud of!

No Hobbit party would be complete without this
sign on the door! I found the sign online and printed it,
then tea stained it to make it look like parchment.

We tried to give our house a Hobbit hole feel by having
little touches like these candles and a map of Middle Earth.


Hobbit beverages. We also had tea and coffee! 


The feast! There is always a lot of food at a Hobbit party.
See the "One Ring Cake" as the centerpiece? I forgot to put
the mushrooms out before I took the picture, but we didn't
forget that hobbit favorite.

Our Hobbit feast menu. I left off strawberries
and cream, but they were there!

An uninvited guest, the largest spider we've ever seen in our house!
My younger daughter said it was "the spawn of Shelob." Fitting.

Whatever the occasion, themed parties are tons of creative fun! What kind of themed party might you have at your hole...er...house?

Wednesday, August 21, 2013

Making Marbled Paper

Making beautiful marbled paper is messy business, but there's nothing quite like having paper you designed yourself to use for crafting. This paper can be used in just about any paper craft you can think of -- card making, scrap booking, a background for a drawing or college, or it can be unique stationery for a note to Grandma.
Here is what you need to make your own marbled paper:
  • sturdy paper, such as card stock or thick drawing paper
  • food coloring in a variety of colors
  • shaving cream foam (not gel)
  • waxed paper 
  • an old gift card or other object with a smooth, flat edge
  • a toothpick or skinny paintbrush
1. To begin, spread out newspaper over a large working area. Cut several sheets of waxed paper and arrange them on your working surface so that you have a working space a few inches wider and longer than the paper you will be working with. 

2. Put a generous blob of shaving cream in the center of the waxed paper.


3. Using the gift card, spread the shaving cream evenly over the waxed paper, so that the area is slightly larger than the paper.


4. Drop a few drops of food coloring, in contrasting colors, onto the shaving cream in a random pattern.


 5. Using a toothpick or the wrong end of a skinny paintbrush, swirl the food coloring around until it looks marbled. It is similar to making a marbled cake.


 6. It should look something like this:

Don't worry if yours turns out looking messier. It will still
look interesting when finished!

 7. Set the paper directly onto the shaving cream and press gently and evenly to ensure all of the paper is coated.


 8. Remove the paper slowly. It will be covered in a thick coating of colorful shaving cream.


 9. Use the wide edge of the gift card to scrape the foam off of the paper, and wipe the colorful foaminess back onto the waxed paper to be used again.*


 10. And now you have a beautiful sheet of marbled paper. Leave it to dry overnight!


*You can use the same batch of shaving cream twice. Follow these steps again with the shaving cream that you scraped off the paper. Try not to mix it up too much when you spread it out over the waxed paper, and don't add any more food coloring. The paper will not have the same swirly pattern, but it will still be interesting.

Wednesday, August 7, 2013

Instagram

We've talked about giving our kids cameras before. Taking photos can be a fun way to get creative no matter where you are! And with things like iPhones and iPods, taking pictures is easier than ever. These photos were taken by my daughter Samantha during our recent vacation to Minnesota, using an app called Instagram. What's fun about using Instagram is that you can experiment with different photo styles, lighting, brightness and contrast, black and whites, and so much more. 

Samantha loves her Converse, and I love the contrast
in this photo. It really pops!

Pretty cool (or hot!) close-up of the smoldering fire.
Have your kids done anything creative with a camera lately?

Wednesday, July 24, 2013

Improvise

Did you miss me?

I've been a busy lady for the last 2 1/2 months: we sold our home, had a baby (our eighth, and we're thrilled!), moved to a temporary rental home, and bought another house two states away. Whew.

We're about to move to the new house, and I've packed up most of the household again, including a lot of our children's things.

So what are they supposed to play with now?

I was quite pleased to find them this morning, playing with dolls and accessories they'd improvised from pipe cleaners. Not a single "I'm booooooored," or nagging from Mom for them to find something to do.

A slice of pizza

Table and chair, with a flower centerpiece

Hairbrush

Basket

Doll #1 in the chair

I'm told Doll #2 is pregnant :D


Wednesday, July 17, 2013

When was the last time you played with Legos?

Legos are as important as bread in our house. We just can't live without them! My kids and I have had many late nights working on some Lego project, most often some kind of house or building of some sort. After the hours and hours of building, our masterpiece will be proudly displayed on the family room shelf, and taken down often to be examined, played with or adjusted.

Legos, or other similar building blocks, are the ultimate creative toy. You can make just about anything you think of with the right assortment of Legos. If you haven't gotten the Legos out in a while, why not make an afternoon or an evening of it with the family?

You might just end up with something awesome, like this:

It's a Lego hotel, with two guest rooms and a pool!


Wednesday, July 10, 2013

Creative fun on the North Shore

Our family went on vacation to the north shore of Lake Superior recently. My husband's parents came along with us, and we all had a fabulous time despite the chilly northern Minnesota weather.

We spent a lot of time chillin' out at the beach, enjoying the waves and relaxing near a bon fire. On the first day, Abuelo (that's Spanish for Grandpa) built this for the kids:


Now, that's what I call creative outdoor fun!

Monday, April 29, 2013

Book Recommendation: Crafty Chloe

Here is a book recommendation for all of you with crafty kids. Crafty Chloe is a charming picture book about a little girl who uses her crafty creativity to solve a birthday gift dilemma.

So read the book! And check out the Crafty Chloe Make-Stuff Blog to find fun crafts for kids.

Tuesday, April 23, 2013

A Mini Poetry Workshop!

Let's face it: poetry is hard.


But it can be fun to write, especially if you understand some of the things that make poetry so darn cool. Like imagery, alliteration, rhythm and, of course, rhyme! Once you (and your kiddos) understand more about how to use these devises in your writing, poetry can become less of a struggle, and more of an engaging challenge.

Imagery

This is simply what you see put into words. When done well, imagery will transport a reader from one place to another, if only in their mind. It is what gives a poem, or any other piece of writing, a sense of place, and can greatly affect the mood.

Example:

Before me the grasses bend

in rhythm with the breeze,
and a cottonwood’s leaves shimmer and dance in the sunlight


Alliteration

Alliteration is a series of words that begin with the same sound, as is often done on tongue twisters. Using alliteration in poetry adds a layer of interest to the way a poem sounds when read aloud.

Example: 

His blood is black and boiling hot.
He gurgles ghastly groans. 

(from "The Troll" by Jack Prelutsky)

Rhythm

All language has a natural rhythm. In poetry, especially rhyming poetry, the rhythm is often a predictable pattern of stressed and unstressed beats, like in a song. This rhythm is usually referred to as meter.

Example:

Twinkle, twinkle little star
How I wonder what you are

These lines have a predictable patter of stressed and unstressed beats. The pattern is simple; every other syllable in each line is stressed. The trick to meter is working the right words into the poem in such a way that the words' natural rhythms will fit into the meter. You can see in the example below how I have fit other words into the same pattern:

Blizzard, blizzard, watch it blow
Whirling, swirling, ice and snow

Rhyme

This one is fairly straight-forward. It is good for budding poets to learn the difference between true rhyme (cat/fat) and near rhyme (rain/again).rhyme can be one of the trickiest parts of writing poetry because of the challenge it can be to find a word that 1) fits the meter, 2) makes sense with the rest of the poem, and 3) rhymes perfectly. A good rhyming dictionary, like the online one at rhymezone.com is a handy tool.


Now, you try it!

1. Have your kids practice imagery by writing descriptive phrases of things they see around them.

2. Practice making up goofy alliterative phrases.

3. Try working on rhythm by writing new words for Twinkle, Twinkle Little Star. Say the words aloud to hear how they fit in the meter.

4. Make lists of rhyming words.

5. Now you are ready to try writing your own poem!


Wednesday, April 3, 2013

Fill Up the Art Box

Whether it is one big box or a few boxes and some dedicated shelf space, it's good to have all or most of your art supplies in one area when creating time comes around. In our house, we use a combination of shelf space and the art box. Here I've filled up our art box with some of our most used items to give you an idea of what kinds of things you might want to include in your collection of art supplies.


Having a box like this is handy for those times when you might want to bring your kids outside (on the deck, porch, to the park) to get them creating. Everything you need is there, with the exception of paper and water. Upon close inspection, you should see the following items:

  • two kinds of paint
  • paint brushes of varying sizes
  • sponge pieces
  • a container for rinsing brushes (we use repurposed lemonade mix containers)
  • scissors
  • a star-shaped hole puncher
  • two kinds of glue
  • pencils
  • a box of oil pastels
  • markers
  • paper towels
  • styrofoam for stamping/printing
  • repurposed lids and fruit cups for paint mixing
  • an eraser
  • fabric scraps for collage
  • old magazines (on the bottom) for collage 
Some other things you might want to add to your box could be crayons, colored pencils, lengths of yarn or string, and other little bits that could be fun to collage with.

What other things might you put in your box?

Monday, April 1, 2013

Celebrate Poetry Month!

April is National Poetry Month, which is a great excuse for you share the wonders and joys of poetry with your children. Exploring various forms of poetry with your kids is a valuable way to get them talking and thinking about imagery, figurative language, rhyme, and meter. The cool thing is, you don't even have to mention those fancy, technical words when talking about poetry. Kids will often pick up on those things themselves without realizing it.

Here are some ways you can explore poetry with your children this month:

  • Read lots of poetry, in different forms. Pick up a poetry book or a rhyming picture book to read at bed time. Poetry anthologies are good resources because they often have a variety of poetic forms to choose from. Nonsense rhymes and limericks can be fun to start with, but don't be afraid to wade out a little deeper and read some haiku or free verse. 
  • Encourage your independent readers to read novels in verse, such as LOVE THAT DOG by Sharon Creech or MAY B. by Caroline Starr Rose. For teenagers, I recommend SHARK GIRL by Kelly Bingham and OUT OF THE DUST by Karen Hesse.
  • Write poetry together. One thing I did with my children when they were younger was to change the words of children's songs, such as Twinkle Twinkle, Little Star or Jingle Bells. They might also enjoy writing list poems, like Shel Silverstein's Sick or Jack Prelutsky's It's Raining Pigs and Noodles
  • Make up tongue twisters. Doing this can not only be fun and hilarious, but also gets your kids practicing alliteration (puffy pandas paddle in puddles).
  • Have a poetry night at your house. Encourage your kids (and you and your spouse) to choose a poem (or poems) to read aloud or memorize a poem to recite. Make it a real celebration complete with party snacks. This could be a way to end poetry month with flair!
Later this month, I will talk specifically about different forms of poetry as well as some fun ways to blend poetry and art. Stay tuned!

Thursday, January 31, 2013

Felt art

A couple of weeks ago, I was working on a hand-sewn project when one of my little girls wandered in to hang out with me. While we chatted, she watched my every stitch. 

I wondered if she'd like to give sewing a whirl.

We went to Walmart and picked up several sheets of felt and some matching embroidery floss, plus a large-eyed, easy-to-thread needle. When we came home, I showed her how to thread a needle, how to knot the end of her floss, and a very basic running stitch

She was ready to roll:


This is now a favorite activity of hers, and it keeps her busy for hours.


For kidlings that are a little too young to use a needle and shears, consider making some sewing cards: punch holes in a thin piece of cardboard (like a cereal box) with a hole punch, and let them practice the ins and outs with a shoelace or a piece of yarn. They'll love being just like mom.


Wednesday, January 23, 2013

Tips for Painters

Here is a good tip for keeping art/craft time fun, neat, and cost-effective.

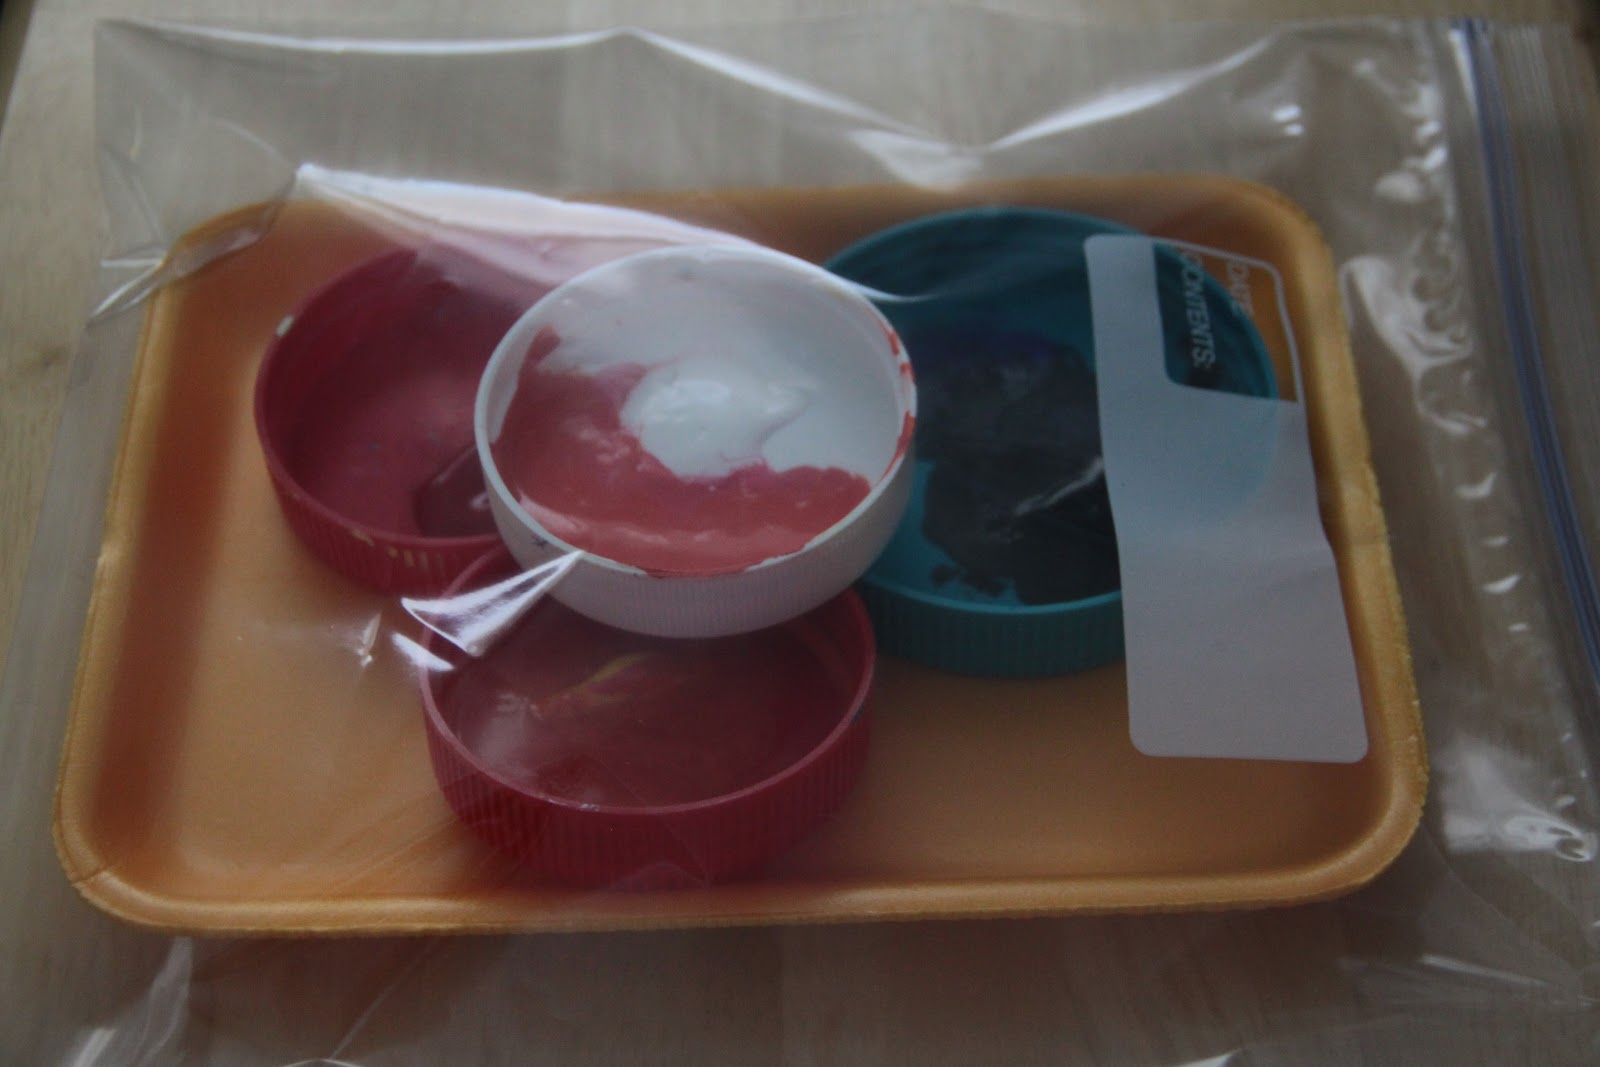
When working with acrylic paints, you will find that, unlike watercolors, they are not water-soluble once dry. But what do you do with all the blobs of paint that are left over when craft time is done?

Drip a drop or two of clean water onto the blob of paint, set the paint cups (we use old peanut butter or mayo lids) onto a tray and put the whole thing into a zipper bag. Seal the bag up and you can leave it for a day or two without it drying out.

Here are a few other tips to remember when using acrylic paints:

  • Acrylic paint is good to use on heavy paper, paper board, canvas and wood crafts. It will not stick to glossy surfaces such as glass or plastic. 
  • Acrylic paint will not wash out once dry! Wear a paint shirt or old clothing. If paint gets on your good clothes, rinse them in cold water right away to help remove the paint and prevent a stain. Same goes for carpet. Avoid painting in a carpeted room if possible, or use a drop cloth to keep the carpets clean. 
  • Remember to wash brushes right away.
  • Acrylic paints mix well and can be thinned with water. 
Have fun painting!

Wednesday, January 16, 2013

Creative babies

Babies are naturally creative, too!

Creativity, in its infancy, comes in the form of learning how things sound, look, smell, taste, feel, and what they do.

"What will happen if I smoosh this... or hit that - with this? Stretch this?"

Stimulate your little one's imagination at a tender age!

Some "toys" that encourage exploration and yield satisfying results for the infant artist:

~ wooden spoons and metal bowls and pans, for music-making
~ small boxes, for stacking (and toppling)
~ mealtimes, for "finger-painting" and a variety of textures and tastes
~ hiding-and-finding games with mama or siblings, for problem-solving
~ a mirror, for self-study
~ someone to read brightly illustrated stories, for literary development
~ the family's piano, lullabies, and recorded music, for singing, dancing, and composing
~ people who laugh and cheer at baby-antics, for performance

No need for expensive computerized learning toys and posh private pre-schools. Everything your prodigy needs is right there at home already.

Wednesday, January 9, 2013

Project Idea -- mixed media pictures

Get your kids inspired with a few cut-up sponges, some poster paint, paper and glue...and look at the kind of art they can do:

Sponge painting is so easy. All you have to do is dip and dab! Start with a slightly damp (not drippy) square of sponge, dip into the paint and dab onto the paper. Add details to the painting with pieces of construction paper, like the sun's rays in this project.

What will your kids create with paint and sponges?

Wednesday, December 26, 2012

Progressive Storytelling

As we've mentioned before, children are natural storytellers. Whether they are retelling an event from their daily life or making up a new adventure, children's imaginations can make for a fascinating story time.

One way to engage your children in active storytelling is to do progressive stories. This could be a good camping or power-outage activity, or just a way for everyone to enjoy a little time together away from technology.

The idea of a progressive story is that it is a collaborative storytelling effort. One child (or a parent) begins the story by describing a character and setting, such as:
Once upon a time, there was a little girl who lived in a castle. She loved to wear pink every day.
The next person takes the next step, possibly sending the little girl into the woods on an errand, or introducing another character (like a villain). The point is for each person to propel the story forward, and to eventually come to a happily ever after (or not) ending.

One of the best things about telling progressive stories with your kids is how it brings to light each of their individual personalities. Your story will be so full of twists and turns that your little pink-loving castle dweller could end up on Mars defeating an alien horde with a handsome prince from a distant galaxy!

Be patient and have fun with this. As the story progresses your kids might, in their excitement, try ditching the original main character and start a whole new story. Keep them on track and remind them of the importance of seeing the story through to the end--just like in their favorite books and movies.

Thursday, December 6, 2012

Wooden peg dolls

I am having a whole lot of fun making stocking stuffers for my kids this year!

One of my favorite ideas for my daughters' stockings: wooden peg dolls. The materials are inexpensive, and they can be as simple or as detailed as you please! 

Oh, the possibilities!


These little pegs can be found at your local craft/hobby store. I found mine at Hobby Lobby in the woodcraft aisle. They are sanded smooth and all ready to go. I bought some acrylic paint for $0.57 a bottle and got started right away. They took a few days to complete, as I paused to let the paint dry between colors, and my Santa's workshop time is limited to post-bedtime hours ;) 

All painted and ready for a clear coat.
After I was satisfied with the paint job, a few coats of polyurethane were added for durability. Poly is available in handy-dandy spray cans. We had some left over from a previous project. Once that was dry, I added a little fabric and sparkle for accents :)

You can do just about anything with these little guys to suit your kids' tastes! For two of my daughters, I am making little families (one of which is pictured here) for their dollhouse. I have a third daughter who is on the adventurous side, and her set will be female superheroes (ie., Mrs. Incredible and Wonder Woman).

After Christmas, I'm going to let them paint a few extra dolls of their own.

Little boys can have fun with these, too! Besides superheroes, think pirates, army men, or ninjas.

After polyurethane, with some added accents:
hair bows, lace, and "jewels"


Just for fun, I picked up a little, unfinished wooden box to paint and monogram. The monogram was very simple. I pulled up Microsoft Word, sized the letter and chose a pretty font, and printed it out. Then I traced the initial on the box with tracing paper and painted it in! 

Are you going to give these a try? Tell us your ideas in the comments below!

Wednesday, November 28, 2012

It's "Ornamental"!

I love handmade ornaments. Some of my favorites are the ones that my kids have made at school. But even better are the ornaments we have made together! This year we took plain glass ornaments and covered them with beads (pictured on the left).

Plain, clear glass ornaments are perfect for customizing because there are so many possibilities! And, barring any gravity-related tragedies, they will be treasured for years to come.

To create the ones pictured here:

Bead Covered Ornament

Use a small paintbrush to cover the entire ornament with a generous layer of Tacky Glue. Then roll the ornament in a bowl full of tiny glass beads. Hang it to dry overnight.

Stuffed Ornament (the one in the middle)

In the one pictured, we simply put a few strips of sheer shiny fabric into the ornament. You could also fill your ornament with tiny paper snowflakes, sparkly yarn, Christmas confetti, or any other light-weight material that you think would look snazzy.

Paint Swirl Ornament

Choose two shades of acrylic craft paint. In ours we used metallic gold and plain white. Squirt a generous amount of each color on opposite sides of the inside of the ornament. Shake gently to spread the paint, then leave it to dry overnight before replacing the ornament cap.

Other Ideas

  • Paint the outside of the ornament with a fun Christmas design and/or your child's name and the year.
  • Use glue to draw a simple design, then sprinkle with glitter.
  • Tie a ribbon to the top of the ornament in place of a hook.

Will you try these? What types of ornaments have you made with your kids?

Monday, November 12, 2012

Playing in the leaves

Today was an unseasonably GORGEOUS fall day. 

We spent it raking and playing with leaves! We have the misfortune of having no trees in our yard, so we traipsed across the street to an elderly neighbor's house and asked if we could have their leaves. They seemed happy to oblige.... we cleaned up their yard and brought the piles home! 

All kids like to jump in a pile of leaves. Now, what else can they think of? 

My kids played a game they invented, like a combination of duck-duck-goose and tag, with some leaf-throwing and pile jumping involved. They also:

were eggs in a nest


made leaf-angels

target-practiced with foam swords

and, oh yeah: they did plenty of jumping!

Happy raking!